前言
TDD 測試驅動開發(Test-driven development),是一種「先寫測試再開發程式」的開發技巧⋯⋯理想上是。實務上,直接把程式碼刻出來,稍微測試 Debug之後發現能動,十之八九就這樣用下去了。未來持續疊床架屋,main branch 上的 Commit 先搶先贏,也就離 TDD 越來越遠了。
就是在如此困境之下,還是想要拆東牆補西壁結構補強,於是就有了本篇文章:為既有 C 語言程式原始碼,加入單元測試,期許未來更穩定的開發。
原始碼目錄結構
本系列教學,假定現有的專案為以下資料夾結構,其中 very_important_func.h 會 include 使用 list8.h 以及 queue.h。
./
├── .git/
├── workspace/
│   ├── main/
│   │   ├── inc/
│   │   │   └── very_important_func.h
│   │   └── src/
│   │       └── very_important_func.c
│   └── shrlib/
│       ├── inc/
│       │   ├── list8.h
│       │   └── queue.h
│       └── src/
│           ├── list8.c
│           └── queue.c
└── README.md
What’s inside list8.h/list8.c
這是本篇文章會用到的測試對象。
#ifndef LIST8_H
#define LIST8_H

#define MAX_LIST8_NODE     (0xFFU)

typedef struct list8_head
{
    unsigned char pos;
    unsigned char size;
} LIST8_HEAD, *LIST8_HEAD_PTR;

typedef struct list8_node
{
    unsigned char prev;
    unsigned char next;
} LIST8_NODE, *LIST8_NODE_PTR;

typedef struct list8_struct
{
    LIST8_HEAD         head;
    LIST8_NODE_PTR     node;
} LIST8_STRUCT, *LIST8_STRUCT_PTR;

void list8_init(LIST8_STRUCT_PTR list, LIST8_NODE_PTR node);

#endif
#include "list8.h"
void list8_init(LIST8_STRUCT_PTR list, LIST8_NODE_PTR node)
{
list->head.pos = MAX_LIST8_NODE;
list->head.size = 0;
list->node = node;
}
使用環境
本系列預計使用:
- 作業系統:Windows 10(含)以上
- 測試框架:Google Test (C++ Framework)
- 編譯器:CMake + MSYS2
我知道,在Windows上安裝環境,永遠是開發前期最困難的部分。為了避免你踩坑,底下依序說明。
下載 Google Test 原始碼
在專案的根目錄打開終端機輸入:
$ git clone https://github.com/google/googletest現在你的專案目錄應該會長成這樣:
./
├── .git/
├── googletest/
│   └── ...
├── workspace/
│   └── ...
└── README.md
下載 CMake + MSYS2
前往 CMake 官網,下載 cmake-3.26.3-windows-x86_64.msi 並安裝。
前往 MSYS2 官網,下載 msys2-x86_64-20230318.exe 並安裝。請留意 MSYS2 並不包含編譯器,他只是讓你能夠集中管理下載各系統的 Native Build。所以安裝完成後請執行 MSYS,我們要使用其内建的 pacman 安裝 gcc 編譯器,這邊我選擇安裝的是 MingGW 32bit 的版本(你可以自行從詳細列表中選擇)。
$ pacman -S mingw-w64-i686-toolchain
:: There are 19 members in group mingw-w64-i686-toolchain:
:: Repository mingw32
   1) mingw-w64-i686-binutils  2) mingw-w64-i686-crt-git  3) mingw-w64-i686-gcc
   4) mingw-w64-i686-gcc-ada  5) mingw-w64-i686-gcc-fortran  6) mingw-w64-i686-gcc-libgfortran
   7) mingw-w64-i686-gcc-libs  8) mingw-w64-i686-gcc-objc  9) mingw-w64-i686-gdb
   10) mingw-w64-i686-gdb-multiarch  11) mingw-w64-i686-headers-git  12) mingw-w64-i686-libgccjit
   13) mingw-w64-i686-libmangle-git  14) mingw-w64-i686-libwinpthread-git  15) mingw-w64-i686-make
   16) mingw-w64-i686-pkgconf  17) mingw-w64-i686-tools-git  18) mingw-w64-i686-winpthreads-git
   19) mingw-w64-i686-winstorecompat-git

Enter a selection (default=all):
請鍵入 Enter 以安裝全部。然後:
- 將 C:/msys64/mingw32/bin 資料夾裡的 xxx-make.exe 重新命名為 make.exe。
- 將 C:/msys64/mingw32/bin 加入系統環境變數
PATH。
打開終端機檢查一下編譯環境:
$ gcc --version
gcc.exe (Rev10, Built by MSYS2 project) 12.2.0
...
$ make --version
GNU Make 4.4
Built for Windows32
...
確認 CMake 編譯環境
在開始撰寫測試之前(別急),讓我們先確認環境沒問題。在根目錄加入 CMakeLists.txt 檔案,貼上以下文字內容。
cmake_minimum_required(VERSION 3.5)

set(GOOGLETEST_VERSION 1.13.0)

project(my_project_name)

# GoogleTest requires at least C++14
set(CMAKE_CXX_STANDARD 17)
set(CMAKE_C_STANDARD 11)

set(CMAKE_VERBOSE_MAKEFILE ON)

enable_testing()

include(GoogleTest)
add_subdirectory(googletest)
在根目錄開啟終端機,輸入以下指令透過 CMake 於 build 資料夾下創建 Makefile 目錄:
$ cmake -S . -B build -G "MSYS Makefiles"
-- The C compiler identification is GNU 12.2.0
-- The CXX compiler identification is GNU 12.2.0
...
-- Found Python: C:/Users/zhung/AppData/Local/Programs/Python/Python310/python.exe (found version "3.10.11") found components: Interpreter
-- Configuring done (80.2s)
-- Generating done (0.7s)
-- Build files have been written to: D:/your/path/to/build
留意,我們特別指定使用 MSYS Makefiles,以避免 CMake 優先使用 Visual Studio 20XX with Windows SDK 環境。
輸入以下指令開始編譯,現在我們的 CMakeLists.txt 設定只有帶入 gtest 主程式。
$ cmake --build build
...
[ 12%] Building CXX object googletest/googletest/CMakeFiles/gtest.dir/src/gtest-all.cc.obj
...
[ 37%] Building CXX object googletest/googlemock/CMakeFiles/gmock.dir/src/gmock-all.cc.obj
...
[ 62%] Building CXX object googletest/googlemock/CMakeFiles/gmock_main.dir/src/gmock_main.cc.obj
...
[ 87%] Building CXX object googletest/googletest/CMakeFiles/gtest_main.dir/src/gtest_main.cc.obj
...
[100%] Linking CXX static library ../../lib/libgtest_main.a
...
[100%] Built target gtest_main 沒問題的話,就表示你的系統可以正常編譯 Google Test 主程式啦!
撰寫第一則測試
現在,在根目錄下加入一個 test 資料夾,我們要把 Test 檔案集中在這邊,例如加入一支 test_list8.cc。
./
├── .git/
├── fff/
│   └── ...
├── googletest/
│   └── ...
├── test/
│   └── test_list8.cc
├── workspace/
│   └── ...
├── CMakeLists.txt
└── README.md
在 test_list8.cc 加入以下內容:
#include <gtest/gtest.h>

extern "C" {
    #include "list8.h"
}

LIST8_STRUCT list;
LIST8_NODE node[MAX_LIST8_NODE];

TEST(TestList8, CaseInit) {
    list8_init(&list, node);
    ASSERT_EQ(list.head.pos, MAX_LIST8_NODE);
};
在 CMakeLists.txt 中加入以下設定:
# ...

include_directories(
    "workspace/shrlib/inc"
)

file(GLOB_RECURSE SHR_SRCS FOLLOW_SYMLINKS ${CMAKE_SOURCE_DIR}/workspace/shrlib/src/*.c)
add_library(
    lib_shrlib
    ${SHR_SRCS}
)

add_executable( test_shrlib test/test_list8.cc )
target_link_libraries(
    test_shrlib
    lib_shrlib
    GTest::gtest_main
)
gtest_discover_tests( test_shrlib )
重新編譯程式:
$ cmake --build build
...
[100%] Built target gmock_main
...沒問題的話,輸入以下指令執行測試:
$ ctest --test-dir build
Internal ctest changing into directory: D:/Work/Desktop/googletest/build
Test project D:/Work/Desktop/googletest/build
    Start 1: TestList8.CaseInit
1/1 Test #1: TestList8.CaseInit ...............   Passed    0.35 sec

100% tests passed, 0 tests failed out of 1

Total Test time (real) =   0.38 sec
撒花!恭喜完成我們的第一支測試程式。你可以在 build/Testing/Temporary 資料夾中看到測試 Log 檔案 LastTest.log 如下:
Start testing: Apr 24 11:55
...
[==========] Running 1 test from 1 test suite.
[----------] Global test environment set-up.
[----------] 1 test from TestList8
[ RUN      ] TestList8.CaseInit
[       OK ] TestList8.CaseInit (0 ms)
[----------] 1 test from TestList8 (0 ms total)

[----------] Global test environment tear-down
[==========] 1 test from 1 test suite ran. (0 ms total)
[  PASSED  ] 1 test.

Test time =   0.35 sec
----------------------------------------------------------
Test Passed.
...
在 VS Code 上使用 Debugger
如果你會使用 gdb 直接 Debug,可以跳過這段。若還是想用 VS Code 的界面,請安裝套件 CMake Tools,重新用 VS Code 打開你的專案目錄,就可以發現狀態欄多出許多按鈕啦!加入 Debug 用的啟動設定於 .vscode/launch.json。
{
    "version": "0.2.0",
    "configurations": [
        {
            // source: https://github.com/microsoft/vscode-cmake-tools/blob/main/docs/debug-launch.md
            "name": "(gdb) Launch",
            "type": "cppdbg",
            "request": "launch",
            // Resolved by CMake Tools:
            "program": "${command:cmake.launchTargetPath}",
            "args": [],
            "stopAtEntry": false,
            "cwd": "${workspaceFolder}",
            "environment": [
                {
                    // add the directory where our target was built to the PATHs
                    // it gets resolved by CMake Tools:
                    "name": "PATH",
                    "value": "${env:PATH}:${command:cmake.getLaunchTargetDirectory}"
                },
                {
                    "name": "OTHER_VALUE",
                    "value": "Something something"
                }
            ],
            "console": "externalTerminal",
            "MIMode": "gdb",
            "setupCommands": [
                {
                    "description": "Enable pretty-printing for gdb",
                    "text": "-enable-pretty-printing",
                    "ignoreFailures": true
                }
            ]
        },
    ]
}
然後在 Debugger Panel 中點選綠色箭頭 ▶,就可以 Debug 啦!嗯?好像哪裏怪怪的。你可能會發現只有 google test (C++) 的程式部分可以跳轉,C 程式都進不去,原因是 gcc 預設 Release Build,不會有 Debug 用的檔案資訊。回到我們 CMakeLists.txt,加入以下設定:
set(CMAKE_C_FLAGS_DEBUG "${CMAKE_C_FLAGS_DEBUG} -g -O0")這樣就可以在 gcc 的編譯步驟加入 -g Flag 以啟用 Debug 編譯。重新編譯過後再啟用 Debugger,現在應該就可以 Step into C function 了!
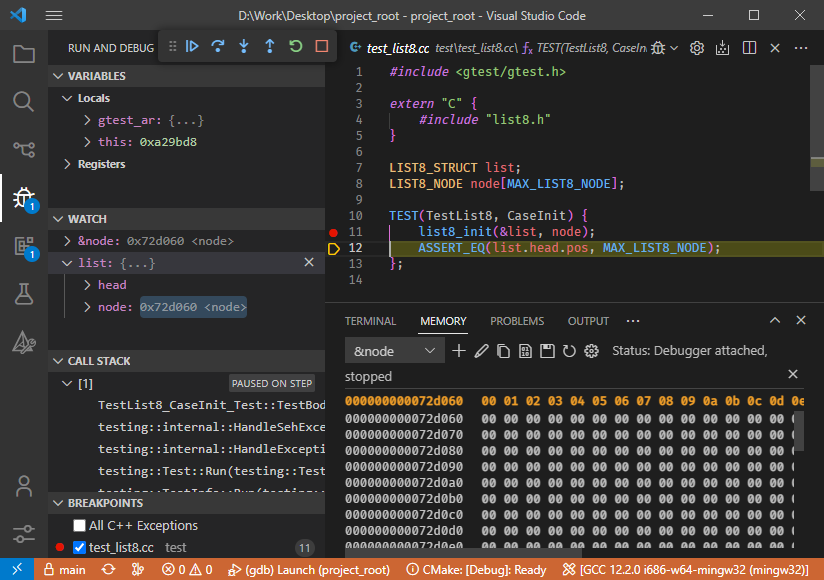
在 Debugger 中使用 Memory View
另外推薦 MemoryView 套件,這樣就可以在 VS Code中觀看 Memory Buffer,此外掛支援的 gdb 有限,所以假如你是用 MSVC Toolkit 將無法調用 Memory View。使用截圖:
現在我們完成了第一支單元測試程式,你可以接著往下了解: